Saturday, 26 September 2015

DIY coffee body scrub

For scars, stretch marks and for that perfect smooth skin..

My DIY coffee body scrub(s)
There are SO many different companies online selling these coffee scrubs which claim to create clear, beautifully soft skin, here's just a couple of them...


                                                                                          http://www.bodyblendz.com.au/

So what's the catch? Why not go buy it right now? If you're not much of DIY'er yourself and you'd rather just spend the money to buy this product then by all means, go ahead! But for those DIY'ers out there like me, who would not only enjoy making their own beauty products and body scrubs, but also enjoy saving the money it costs them to buy a product that does the same thing, then keep reading! 

To make your own Coffee body scrub you will need:
Coffee.
Coconut oil/Shea butter.
An empty tub or container (to keep your scrub in).
A bowl or something to mix the ingredients together in.


Step ONE
Take your coffee: 


And your Coconut oil/ Shea butter (you can use either of these ingredients, dependant on your personal preference). I chose Coconut oil as I prefer the smell!


Step TWO
Take 40% Coconut oil/Shea butter and 60% coffee and mix your ingredients in your bowl until they are entirely evenly distributed. The amount of coffee and oil that you use I.E 100ml, 50ml etc. all depends on how much scrub you want to make, so the more ingredients you use, the larger the amount of coffee scrub you will end up with will be.
         Dependant on what type of oil or butter you used and what type of coffee, your scrub should end up resembling something like this:


And your scrub is quite literally ready to go! You can change up the type of oil or body butter that you use and see the different effects it has on your skin. but personally coconut oil is definitely something that makes my skin feel super soft! You can also change the harshness of the coffee granule, from very fine small granules to larger more coarse grains, or creating a mixture of the two!

Quick Tip! If you decided to use Coconut oil for the base of your scrub, like I did, then just a tip: don't use this scrub as a daily body wash, reason being that with the added oil to your skin, your own skin will attempt to combat this and so if you use the coconut oil on your skin too often, your skin will react by overcompensating and it will become overly oily (which nobody wants). Using this scrub 2/3 times a week maximum will not create any overly oily skin!

So how does this coffee scrub work exactly?

What coffee does: On the skin, the caffeine in coffee can reduce the appearance of cellulite and create firmer looking skin. The coffee granules will also exfoliate the skin, breaking down dead skin cells and leaving you with glowing fresh skin. The benefit of using this coffee scrub as an exfoliator rather than a chemically created one, is that the natural harshness and lack of harsh chemicals within coffee, prevent skin damage. Exfoliation improves the circulation in your skin which leads to smooth glowing skin! 

What coconut oil/Shea butter do: Shea butter is just an excellent skin conditioner, intended for use on the skin, i.e hands, arms, legs, rather than the scalp etc. Coconut oil however, can be used almost anywhere on the body. Coconut oil can be used as an intensive scalp treatment for dry or flaky scalps, it can be used as a makeup remover, a deep conditioner for the ends of your hair, an intense skin moisturiser, it can also be used to whiten teeth and is also edible and digestible.  


Thursday, 17 September 2015

Hanging Tissue Paper DIY


Tissue Paper DIY's.

I have always been the kind of person who was drawn to DIY's which appeared incredibly complicated and challenging; but were in fact more simple than you could have imagined. Tissue paper is a medium which allows you to make your creations look that much more complex and intricate than what they really are. These two tissue paper DIY's are incredibly simple and easy to make, using minimal supplies and, for those busy DIYers, take up minimal time!


Hanging Tissue Paper Heart/ Letter.

You will need:
Tissue paper/ crepe paper (in whatever colours you wish to use!).
Plenty of Cardboard (any thickness, from cereal box, to heavy duty moving boxes).
A Pen.
A pair of Scissors (that will be able to cut your chosen cardboard).
A Glue gun (I choose to use a glue gun as it's the quickest and most effective way to work, you can use another glue but it will slow the process down a lot).


Step ONE
Take your cardboard, obviously the size of your piece of cardboard needs to correlate with the size of the heart or letter you wish to make. And draw out your heart or letter (In 3D form, i.e bubble writing style)

Mine is already cut out here but you can see what I mean by the shape of the lettering.

Just to show you the thickness of my cardboard, I think I used just a parcel box, slightly
thicker than a cereal box!

Then you want to cut out your heart shape or letter and you should end up with something similar to my
images!

Step TWO
You now want to put your cut out to one side and get your tissue paper. To make these flower looking creations on your cut out we need to prepare the tissue paper. Your tissue paper so come packaged similar to this: 


Taking the entire piece of tissue paper as it is, or removing some of the pieces if you have a smaller cut out shape, but maintaining that original shape of the tissue/crepe paper. FOLD the tissue paper in half. It should now look similar to this:


Now you have a couple of choices, if you want to save time and use your tissue paper more sparingly, then follow what I'm about to show you! If you would prefer to create smaller 'flowers' on your cut out then you will have to take what I show you and fold your tissue/crepe paper smaller than what I do.  
Once your tissue paper is folded in half, you want to now fold your paper into an 'S' shape fold, take on side over the top, in front of the paper like this:


And then fold the other side BEHIND the tissue paper, and from this angle it will look like an 'S' shape fold:


You just want to squash that flat to make it easier for you to cut this later...

Step THREE
Now you want to cut circle/oval shapes out of this fold you have created, you can draw this onto the tissue/crepe paper if you need, I like the shapes to be more irregular and not exactly perfect (as it also isnt necessary), and so here's an example image of the shape I cut from my paper:

So you pretty much only need to cut off the corners!


Repeat steps Two and Three with all of the colours or papers that you are using, if you're only using one colour then you're already ready for the next step!

Step FOURYou're going to need your cut out shape back now, and turn on your glue gun! You're going to take one of your oval/circle pieces of tissue/crepe paper, placing your finger in the middle of the shape and pinching from the under side, like this:


Once you've got that pinched just pinch it harder and twist the paper slightly in your grip, you should end up with something similar to this: 


You can repeat this process with all of your circles of paper immediately or continue to do this process as you go along (I normally just pinch and twist the paper as I go along).

Step FIVE
Time to start glueing! Taking your glue gun, applying a small amount of the glue onto your cardboard cut out shape, you can start in the middle or wherever you like, it's not going to make a difference on the final product. And quickly before the glue begins to cool/dry stick down your paper 'flower' bottom to the cardboard (the bottom is where you pinched).


Continue this process over and over, shaping the flowers as you like once they're glued to your shape, creating the look that you like best!


And there you have it! The colours that I used in my examples for this are not the best combination but I cut all the tissue paper before I realised I didn't even like my own colour combination and didn't want to waste the paper! It looks cute on the wall though so it's not all bad!
If you want to hang your cardboard shapes.. This step is very simple, take whatever type of hanging material you want to use; string, ribbon, thread etc. and tie this in a loop, using your glue gun, secure this in place! Be sure to measure the length of your string/ribbon before you glue it to your shapes (although it can easily be removed and replaced!).

More DIY's coming very soon so stay tuned for more! 


Wednesday, 9 September 2015

AW15 is coming!

Autumn/Winter of 2015 is right around the corner. I don't know about you, but Autumn is by far my favourite season and nothing beats snuggling up next to a warm fire on a cold winter's day..
Not only is Autumn home to both my birthday and bonfire night (the best holiday of the year), but the colours, the smells, the cold Autumn air brushing your cheeks to give you that nice flushed pink face, not the runny nosed, blue lipped, bright red faced look I tend to go for during the height of Winter.
         Autumn brings back the cosy jumpers/sweaters, the baggy and oversized tops, cosy socks, cardigans and scarves, a new line of AW15 coats and accessories! This year I am a huge fan of the waterfall styled coats, alongside the maxi sleeveless jackets.... 
Victoria Beckham styling the Sleeveless jacket in Vogue UK

A Waterfall belted jacket from Missguided
https://www.missguided.co.uk

Maxi waistcoat Zara UK
http://www.zara.com/uk


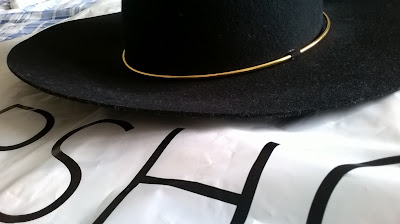
I was a huge fan of the 'Floppy hat' during SS15 and having seen so many cute hats coming out for AW I could no longer resist the urge and had big plans for purchasing one of the slightly smaller versions of the floppy hat for AW15. When visiting TOPSHOP this weekend, I found this beauty..


(Evidently I purchased it, and cannot wait to wear it everywhere possible!) Thank you TOPSHOP, once again! 


A new comeback which I am loving for this AW is suede! All the local highstreet stores such as H&M, Next, Missselfidge, Hollister, Topshop, ZARA and Riverisland have all joined the suede frenzy which is taking over AW15. Some of these suede/ faux suede pieces include skirts, jackets, waistcoats, bags and tops!


Tan Faux Suede jacket with a fringe hem. Missguided
https://www.missguided.co.uk


The Faux Suede A-line skirt from Hollister
http://www.hollisterco.com

Another Faux suede look from HollisterCo is this Faux suede tie up front dress which comes in Navy and Red, and I love it!

http://www.hollisterco.com


My favourite colours for this Autumn/Winter which I've seen EVERYWHERE are definitely: Mauve, khaki, grey, Cream/ off white, black, deep navy, deep red berry shades and Rust (a reddy brown). For AW15 it seems all the top designers have gone for the simple, clean cut designs, using muted, traditional winter colours creating a classy, sophisticated and yet subtle and soft look for the winter. A lot of what I've been seeing lately, in high street stores, high end fashion shoots, celebrity style and just in and around the city in general, is one colour, different toned outfits. I.E nudes, including white, off white, beige and tan in one outfit. Or another example would be the Navy's- taking a statement Navy piece, perhaps a maxi Navy trench coat, and pairing it with black jeans, dark blue or black tops and shoes. These one toned outfits create an EXTREMELY put together look, which dependant on your own personal style, can look very classy and 'business like' or completely shabby chic. No matter what your personal style, this one toned AW15 look is a winner all around!

Let me know what your favourite looks are for this AW in the comments!


Tuesday, 8 September 2015

The ALL SOULs Trilogy Part ll

Deborah Harkness ALL SOULs Trilogy 
Shadow of Night.

Having only posted a few short days ago praising the first book within this Trilogy A Discovery of Witches and at that point being only at a mere chapter 10 of the novel, I have now finished the first book in Harkness' series; with great excitement and enthusiasm I might add, and am now fully submersed and obsessed with the incredible fictional world Harkness has created within these novels as I begin to steam through the first chapters of the second novel, hesitant to read too quickly as to end this Trilogy so quickly, when I am so in love with it's characters and their story.
              To say that I am captivated and entirely in love with Mathew Clairmont would be a huge understatement entirely! Having previously described myself as a Twilight fan, I may now be so inclined as to name myself an ALL SOULs Trilogy fan- Or you could call me an ALL SOULs addict! Having only just recently discovered this entirely CAPTIVATING world of Diana Bishop and Mathew de Clairemont, I feel betrayed and incredibly heartbroken that I am almost half way through the trilogy and before I know it the world of Diana and Mathew will be lost to me forever, as their story will come to an end, no matter how much I wish it to continue!
           
One slight downfall in this second edition to the story is the lack of Oxford and the University setting that was so whitsful and romantic, homely almost to Diana and Mathew's relationship. I have not yet read the final book in the trilogy however, not because it has bored me, but because I simply do not want this story to come to an end, and I hope to see more of the university's calming, romantic setting in the last novel.
             For any Vampire diaries, Twilight, or fantasy romance fans out there, THIS is the trilogy you need to get your hands on next. Totally in love.


Wednesday, 5 August 2015

The ALL SOULs Trilogy

Deborah Harkness, A Discovery of Witches.


Since beginning my English Literature degree just over 10 months ago I had done little to no personal reading, and by that I mean reading for leisure, not for a seminar or a module topic. After feeling desperate to read something for my own enjoyment I found myself standing in the all too familiar Science Fiction and fantasy section in Waterstone's searching through the hundreds of 'best selling' novels and novellas that of which none appeared to take my fancy; as per usual. After standing for a solid ten to fifteen minutes contemplating to ruin the ongoing tv series of Game of Thrones by purchasing the popular novels, when I stumbled across the book, A Discovery of Witches by Deborah Harkness. After quickly skimming the blurb and spotting the comment from THE SUNDAY TIMES 'Intelligent and off-the-wall...irresistible to Twilight fans', I knew there was no going back. Let me explain myself before passing judgement on my evident favouring of the Twilight Saga.
          After becoming hooked on the Vampire Diaries novels by L.J Smith, finishing the entire of the collection in a week and having now become an avid fan of the ongoing series staring Ian Sommerhalder and Nina Dobrev, it may be of little surprise to you that I am a huge fan of Vampire, Werewolf, Succubus, Mythical and Magical creature based fiction. Lord of the Rings and The Hobbit being no exception to this rule. And so this correlation made between Twilight and Deborah Harkness' ALL SOULs Trilogy struck me as solid ground to assume my enjoyment in this trilogy (I also much prefer a series of books within a story, a trilogy or the more the merrier).
           I have now reached a mere chapter 10 in this 688 page, 43 chapter novel and I can safely say I am captivated and entirely consumed by the fictional world of Dr. Diana Bishop and Mathew Clairmont. The novel did come off to a slow paced start but this appears to have only enhanced the intensity which has become apparent will continue throughout the trilogy. Harkness has solidly managed to grab my attention and to lure me into this world of vampire's, witches and demons; unsurprisingly given the above statements of my genre choice. However, a novel including such mythical creatures is not solely enough to keep my attention and Harkness has managed to captivate me within her story even though I am only a short way into this trilogy. I decided to pause from my obsessive reading schedule to write this review or short praise I suppose I could call it so that not only could I then comment on the novel later on and also the rest of the novels within the ALL SOULs trilogy, but in the hope of reaching some avid Sci-fi/ Fantasy readers like myself and to tell you to not waste any more time in this life, but to go and purchase this book IMMEDIATELY and join this thrilling world of fiction which Harkness has created within these novels.

I can't stop reading.... 


Friday, 12 June 2015

Tree Stump DIY's

I am myself a person who finds comfort outside, with nature, rather than being inside. And so when an opportunity arises that allows me to bring some of nature in to my home and my everyday life, I will jump at those ideas! 

DIY also happens to be something that agrees with me on many levels- always a proud moment when someone asks you where you got that necklace from or where you bought that coffee table and you can proudly say, "I made it, actually", nothing quite beats that warm feeling of pride! And so that's why today I am going to give you just a few of the many possibilities of Tree Stump DIY's. 


Let's get started! 


1. Bedside Table/ Lamp table

Everyone has a bed, right? So what's not to love about this idea! Dependant on the span and width of the tree stump you have, changes the surface area of your table- super small for a quaint, delicate looking piece of furniture, or more chunky and obvious to create more of a statement piece: 


The first Idea is simple yet dramatic and understated. The tree stump here remains completely natural in form and shape but works incredibly well as a side table to be used for books, magazines, a lamp, or a good old cup of tea! *she goes to make a tea*.

The latter of the two can be interpreted in many different ways. Simply by slicing your tree stump (to your desired thickness and shape etc.) and then adding the legs. This table would look like an entirely new and unique piece of furniture just by using a different coloured Metal leg or a different style of table leg all together- 


The possibilities are endless! And needless to say A LOT cheaper than what you would pay for a piece of furniture like this.
A good tutorial link:http://fallfordiy.com/blog/2014/06/17/diy-copper-pipe-and-wood-slice-side-table/ 


2. Chair/ Seat

From outdoor furniture to handy kitchen stools, tree stumps can make GREAT seats! Dependant on the amount of work you are willing to put into them, these seats can become incredibly comfortable and appear store quality, if not even better- as your seat will be completely limited edition and one of a kind! 

The first idea (image) would require a very large tree stump- which isn't easily accessible to most people, but if that large of a tree stump should come your way, you now know what you could use that for! You could, however, make a smaller version of this that would most likely be the size for a child; The idea seems that you would need to first cut your tree stump and carve to your desired shape, and as seen in the image, create a kind of wooden block effect chair leg (big enough to hold the weight), you could also create a flat bottom to your seat which would allow the seat to sit flat on the ground for a slicker effect! 


The second idea is similar to the concept of the beside table, besides the fact that the legs would have be much sturdier to hold a person's weight, and the surface area of your stool would also need to be large enough to fit someone on it! 


The last idea for a tree stump seat is to use the entire tree stump as it stands (again a more natural and organic looking approach), and to attach a cushioned seat on top of the stump. This cushioning could be done in many different ways, also using any type of fabric you desired! I would suggest nailing/ pinning the cushion around circumference of the stump- creating a sewed look, or making an elasticated seat cover that you could hook over the stump- this would also allow you to swap and change your seat covers whenever you felt like it!

3. Chalk Board 


A chalk board is something that EVERY household can find a use for! Be it for children, notes for one another, reminders or just ornamental purposes, you can never go wrong with a chalk board; especially when it looks as good as this.


This DIY is as simple and easy as it looks! Taking your stump and slicing/ cutting your tree stump to your desired shape and thickness, and then painting the stump with Chalkboard paint and you're ready to go!

You can also create different ways of hanging/ displaying your chalkboards around your house: On the kitchen counter, hanging by the front door (to remind you of important things), or creating more of a statement look using hooks or shelving to display your boards!


4. Bottle holder/ storage
Unless you already own a bottle storage unit then bottles can be a difficult thing to store without looking cluttered and messy in your home! So here's a rustic DIY that will not only fix your cluttered kitchens, but look great whilst doing so!


This DIY requires a tree stump that will have a deep enough width to it to ensure the bottles fit inside it, without falling out! This DIY may take a little longer than others, you will need to measure the size of your bottle against the width of the stump and the carving process is also important as you don't want your bottles to end up wedged inside a tree stump! This DIY is incredibly diverse also! You can use this to store jars, bottles, glasses, cans, whatever you like! and it doesn't have to be used in this portrait style as shown, but could be laid flat in a horizontal manner to create an entirely different look! 


5. Planter

Using your old tree stumps as planters creates an incredibly natural, organic looking product that fits in with the natural plants rather than juxtaposing them! These are very easy to make and can be used in SO many different ways! Here are a few of my favourite examples:


These planters couldn't be much more simple to make! You simply hollow out, cut or carve the area you want to place your plants and then you can do this one of two ways; the first and simplest is just to use the tree stump like a plant pot, filling with soil and planting your plants, OR another way would be to place plant pots inside the area you have carved to allow the plants to be moved from these stumps more easily! 

6. Candle Holders

As a massive candle fan myself this idea is one of my favourites. It's very similar to the last DIY (Planters) and only requires you to carve a shallow hole in the stump, big enough for the candle you have chosen!


I would recommend using candles that are within containers already, such as everyday tea lights so that the candle doesn't burn through the wood. As shown in these pictures you can also decorate your tree stump candle holders however you like! 

7. Decorative Prints/ Tree stump Relief Printing

If you are a nature lover or art lover like myself then this next one could be of interest to you- Creating easy, simple art work from your old tree stumps that are timeless and incredibly beautiful and fascinating (to some). INK PRINTING!


This one doesn't need much explanation on the DIY side, but you may be interested to know that their are artists that make these prints and sell them for a lot of ££ and yet you can make and frame them yourself for next to nothing! 


8. Coffee Table
Yes, we've returned to furniture, however these tables tend to require a much bigger tree stump then the previous ideas and DIY's, it is (again) one to keep in mind if ever you did get your hands on a large tree stump! These pieces of furniture have become very popular with high end brands and honestly, cost a fortune! Trust me, in my hours of procrastination I have looked, more than once!


Using a much thicker piece of wood in this idea and the wheels are genius! Given how heavy this table would be, it allows you to move the table with ease and also lifts it off the ground as legs would! 


Simple, obvious, yet never thought of! This piece looks incredibly natural and using a longer length of wood like this is less common to find yet looks amazing! covered in a simple varnish and ready to use! 


Stacking! Rather than one solid lump of tree stump, slicing the stump and stacking the pieces just slightly off centre to one another creates a textured layered effect that wouldn't find anywhere else in a coffee table! How you secure these pieces (or if you choose not to which I wouldn't recommend), is up to you! Wood glue, Nails, screws, HOWEVER!
Alike the beside tables mentioned before, these tables can be created in SO many different ways and every single one will be unique and one of a kind!


9. Photo 'Frames' 

A common household ornament is photos, displayed in frames that can smash and brake and that can end up costing a lot of money! Here's a way you can take your unwanted tree stumps and create unbreakable (so to speak) and unique photo 'frames'....


This can be done in many different inexpensive ways so I will link my favourites:

http://www.mykitchenescapades.com/2013/10/photo-transfer-onto-wood.html

http://www.ehow.com/how_6732929_transfer-ink-wood.html?utm_source=pinterest&utm_medium=fanpage&utm_content=inline&crlt.pid=camp.r13lZlSOfMqi&crlt.pid=camp.HQ4Kb6S8yjdh

10. INSPIRE ME! 
I have spent endless hours looking at pinterest *realising how sad I am beginning to sound*, so inspire me with any new ideas and ways to use tree stumps in a DIY that brings a bit of nature in to our lives.

Thanks for reading (this incredibly long post), I hope I inspired some DIY's

-H