Saturday, 26 September 2015

DIY coffee body scrub

For scars, stretch marks and for that perfect smooth skin..

My DIY coffee body scrub(s)
There are SO many different companies online selling these coffee scrubs which claim to create clear, beautifully soft skin, here's just a couple of them...


                                                                                          http://www.bodyblendz.com.au/

So what's the catch? Why not go buy it right now? If you're not much of DIY'er yourself and you'd rather just spend the money to buy this product then by all means, go ahead! But for those DIY'ers out there like me, who would not only enjoy making their own beauty products and body scrubs, but also enjoy saving the money it costs them to buy a product that does the same thing, then keep reading! 

To make your own Coffee body scrub you will need:
Coffee.
Coconut oil/Shea butter.
An empty tub or container (to keep your scrub in).
A bowl or something to mix the ingredients together in.


Step ONE
Take your coffee: 


And your Coconut oil/ Shea butter (you can use either of these ingredients, dependant on your personal preference). I chose Coconut oil as I prefer the smell!


Step TWO
Take 40% Coconut oil/Shea butter and 60% coffee and mix your ingredients in your bowl until they are entirely evenly distributed. The amount of coffee and oil that you use I.E 100ml, 50ml etc. all depends on how much scrub you want to make, so the more ingredients you use, the larger the amount of coffee scrub you will end up with will be.
         Dependant on what type of oil or butter you used and what type of coffee, your scrub should end up resembling something like this:


And your scrub is quite literally ready to go! You can change up the type of oil or body butter that you use and see the different effects it has on your skin. but personally coconut oil is definitely something that makes my skin feel super soft! You can also change the harshness of the coffee granule, from very fine small granules to larger more coarse grains, or creating a mixture of the two!

Quick Tip! If you decided to use Coconut oil for the base of your scrub, like I did, then just a tip: don't use this scrub as a daily body wash, reason being that with the added oil to your skin, your own skin will attempt to combat this and so if you use the coconut oil on your skin too often, your skin will react by overcompensating and it will become overly oily (which nobody wants). Using this scrub 2/3 times a week maximum will not create any overly oily skin!

So how does this coffee scrub work exactly?

What coffee does: On the skin, the caffeine in coffee can reduce the appearance of cellulite and create firmer looking skin. The coffee granules will also exfoliate the skin, breaking down dead skin cells and leaving you with glowing fresh skin. The benefit of using this coffee scrub as an exfoliator rather than a chemically created one, is that the natural harshness and lack of harsh chemicals within coffee, prevent skin damage. Exfoliation improves the circulation in your skin which leads to smooth glowing skin! 

What coconut oil/Shea butter do: Shea butter is just an excellent skin conditioner, intended for use on the skin, i.e hands, arms, legs, rather than the scalp etc. Coconut oil however, can be used almost anywhere on the body. Coconut oil can be used as an intensive scalp treatment for dry or flaky scalps, it can be used as a makeup remover, a deep conditioner for the ends of your hair, an intense skin moisturiser, it can also be used to whiten teeth and is also edible and digestible.  


Thursday, 17 September 2015

Hanging Tissue Paper DIY


Tissue Paper DIY's.

I have always been the kind of person who was drawn to DIY's which appeared incredibly complicated and challenging; but were in fact more simple than you could have imagined. Tissue paper is a medium which allows you to make your creations look that much more complex and intricate than what they really are. These two tissue paper DIY's are incredibly simple and easy to make, using minimal supplies and, for those busy DIYers, take up minimal time!


Hanging Tissue Paper Heart/ Letter.

You will need:
Tissue paper/ crepe paper (in whatever colours you wish to use!).
Plenty of Cardboard (any thickness, from cereal box, to heavy duty moving boxes).
A Pen.
A pair of Scissors (that will be able to cut your chosen cardboard).
A Glue gun (I choose to use a glue gun as it's the quickest and most effective way to work, you can use another glue but it will slow the process down a lot).


Step ONE
Take your cardboard, obviously the size of your piece of cardboard needs to correlate with the size of the heart or letter you wish to make. And draw out your heart or letter (In 3D form, i.e bubble writing style)

Mine is already cut out here but you can see what I mean by the shape of the lettering.

Just to show you the thickness of my cardboard, I think I used just a parcel box, slightly
thicker than a cereal box!

Then you want to cut out your heart shape or letter and you should end up with something similar to my
images!

Step TWO
You now want to put your cut out to one side and get your tissue paper. To make these flower looking creations on your cut out we need to prepare the tissue paper. Your tissue paper so come packaged similar to this: 


Taking the entire piece of tissue paper as it is, or removing some of the pieces if you have a smaller cut out shape, but maintaining that original shape of the tissue/crepe paper. FOLD the tissue paper in half. It should now look similar to this:


Now you have a couple of choices, if you want to save time and use your tissue paper more sparingly, then follow what I'm about to show you! If you would prefer to create smaller 'flowers' on your cut out then you will have to take what I show you and fold your tissue/crepe paper smaller than what I do.  
Once your tissue paper is folded in half, you want to now fold your paper into an 'S' shape fold, take on side over the top, in front of the paper like this:


And then fold the other side BEHIND the tissue paper, and from this angle it will look like an 'S' shape fold:


You just want to squash that flat to make it easier for you to cut this later...

Step THREE
Now you want to cut circle/oval shapes out of this fold you have created, you can draw this onto the tissue/crepe paper if you need, I like the shapes to be more irregular and not exactly perfect (as it also isnt necessary), and so here's an example image of the shape I cut from my paper:

So you pretty much only need to cut off the corners!


Repeat steps Two and Three with all of the colours or papers that you are using, if you're only using one colour then you're already ready for the next step!

Step FOURYou're going to need your cut out shape back now, and turn on your glue gun! You're going to take one of your oval/circle pieces of tissue/crepe paper, placing your finger in the middle of the shape and pinching from the under side, like this:


Once you've got that pinched just pinch it harder and twist the paper slightly in your grip, you should end up with something similar to this: 


You can repeat this process with all of your circles of paper immediately or continue to do this process as you go along (I normally just pinch and twist the paper as I go along).

Step FIVE
Time to start glueing! Taking your glue gun, applying a small amount of the glue onto your cardboard cut out shape, you can start in the middle or wherever you like, it's not going to make a difference on the final product. And quickly before the glue begins to cool/dry stick down your paper 'flower' bottom to the cardboard (the bottom is where you pinched).


Continue this process over and over, shaping the flowers as you like once they're glued to your shape, creating the look that you like best!


And there you have it! The colours that I used in my examples for this are not the best combination but I cut all the tissue paper before I realised I didn't even like my own colour combination and didn't want to waste the paper! It looks cute on the wall though so it's not all bad!
If you want to hang your cardboard shapes.. This step is very simple, take whatever type of hanging material you want to use; string, ribbon, thread etc. and tie this in a loop, using your glue gun, secure this in place! Be sure to measure the length of your string/ribbon before you glue it to your shapes (although it can easily be removed and replaced!).

More DIY's coming very soon so stay tuned for more! 


Wednesday, 9 September 2015

AW15 is coming!

Autumn/Winter of 2015 is right around the corner. I don't know about you, but Autumn is by far my favourite season and nothing beats snuggling up next to a warm fire on a cold winter's day..
Not only is Autumn home to both my birthday and bonfire night (the best holiday of the year), but the colours, the smells, the cold Autumn air brushing your cheeks to give you that nice flushed pink face, not the runny nosed, blue lipped, bright red faced look I tend to go for during the height of Winter.
         Autumn brings back the cosy jumpers/sweaters, the baggy and oversized tops, cosy socks, cardigans and scarves, a new line of AW15 coats and accessories! This year I am a huge fan of the waterfall styled coats, alongside the maxi sleeveless jackets.... 
Victoria Beckham styling the Sleeveless jacket in Vogue UK

A Waterfall belted jacket from Missguided
https://www.missguided.co.uk

Maxi waistcoat Zara UK
http://www.zara.com/uk


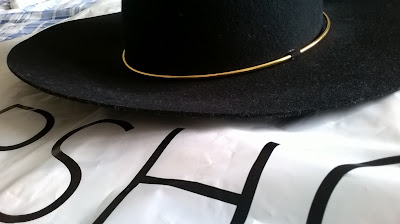
I was a huge fan of the 'Floppy hat' during SS15 and having seen so many cute hats coming out for AW I could no longer resist the urge and had big plans for purchasing one of the slightly smaller versions of the floppy hat for AW15. When visiting TOPSHOP this weekend, I found this beauty..


(Evidently I purchased it, and cannot wait to wear it everywhere possible!) Thank you TOPSHOP, once again! 


A new comeback which I am loving for this AW is suede! All the local highstreet stores such as H&M, Next, Missselfidge, Hollister, Topshop, ZARA and Riverisland have all joined the suede frenzy which is taking over AW15. Some of these suede/ faux suede pieces include skirts, jackets, waistcoats, bags and tops!


Tan Faux Suede jacket with a fringe hem. Missguided
https://www.missguided.co.uk


The Faux Suede A-line skirt from Hollister
http://www.hollisterco.com

Another Faux suede look from HollisterCo is this Faux suede tie up front dress which comes in Navy and Red, and I love it!

http://www.hollisterco.com


My favourite colours for this Autumn/Winter which I've seen EVERYWHERE are definitely: Mauve, khaki, grey, Cream/ off white, black, deep navy, deep red berry shades and Rust (a reddy brown). For AW15 it seems all the top designers have gone for the simple, clean cut designs, using muted, traditional winter colours creating a classy, sophisticated and yet subtle and soft look for the winter. A lot of what I've been seeing lately, in high street stores, high end fashion shoots, celebrity style and just in and around the city in general, is one colour, different toned outfits. I.E nudes, including white, off white, beige and tan in one outfit. Or another example would be the Navy's- taking a statement Navy piece, perhaps a maxi Navy trench coat, and pairing it with black jeans, dark blue or black tops and shoes. These one toned outfits create an EXTREMELY put together look, which dependant on your own personal style, can look very classy and 'business like' or completely shabby chic. No matter what your personal style, this one toned AW15 look is a winner all around!

Let me know what your favourite looks are for this AW in the comments!


Tuesday, 8 September 2015

The ALL SOULs Trilogy Part ll

Deborah Harkness ALL SOULs Trilogy 
Shadow of Night.

Having only posted a few short days ago praising the first book within this Trilogy A Discovery of Witches and at that point being only at a mere chapter 10 of the novel, I have now finished the first book in Harkness' series; with great excitement and enthusiasm I might add, and am now fully submersed and obsessed with the incredible fictional world Harkness has created within these novels as I begin to steam through the first chapters of the second novel, hesitant to read too quickly as to end this Trilogy so quickly, when I am so in love with it's characters and their story.
              To say that I am captivated and entirely in love with Mathew Clairmont would be a huge understatement entirely! Having previously described myself as a Twilight fan, I may now be so inclined as to name myself an ALL SOULs Trilogy fan- Or you could call me an ALL SOULs addict! Having only just recently discovered this entirely CAPTIVATING world of Diana Bishop and Mathew de Clairemont, I feel betrayed and incredibly heartbroken that I am almost half way through the trilogy and before I know it the world of Diana and Mathew will be lost to me forever, as their story will come to an end, no matter how much I wish it to continue!
           
One slight downfall in this second edition to the story is the lack of Oxford and the University setting that was so whitsful and romantic, homely almost to Diana and Mathew's relationship. I have not yet read the final book in the trilogy however, not because it has bored me, but because I simply do not want this story to come to an end, and I hope to see more of the university's calming, romantic setting in the last novel.
             For any Vampire diaries, Twilight, or fantasy romance fans out there, THIS is the trilogy you need to get your hands on next. Totally in love.